June 30, 2014

Happiness... by PINQUETTE Kimberly

♥ ♥ ♥ WELCOME PRETTY LITTLE PEACOCKS ♥ ♥ ♥
Make sure to become a Follower
then Stop by the 300 Follower Giveaway TO ENTER TODAY


Good Morning, just a quick posting for you today.

You know me, you know I like simple and elegant.
I have both with this quick and easy card.

Some simple embossing, some ribbon, (though, not my ribbon of choice), add some pearls, and you have a fast, quick yet elegant card.
You have to love this beautiful Pinque Peacock Nanna's Pillowcase button
the colors are almost perfect with the choice of green paper.


I completed my card by adding some small ivory pearls around parts of the embossed design and a nice sentiment. I will be sending this card to a friend, and I thought this was the perfect sentiment to help brighten her day.

Thanks for stopping in today. Be sure to check out the Pinque Peacock store,
I know you will find a lot of wonderful products.
♥ ♥ ♥ ♥ ♥ ♥ ♥ ♥
Thank you PINQUETTE Kimberly,
your card is absolutely BEAUTIFUL!!
Visit Kimberly at her blog
to become a New Follower!
♥ ♥ ♥ ♥ ♥ ♥
LINK UP YOUR PROJECT...
For Our 7th Challenge!
The theme for this challenge is
SUMMER....
head on over and join in the fun!!!
Snag Our Badge
***************
And then head on over to the NEW PINQUE PEACOCK Crafty Kit Club
Fan Page and check out all the rage there!!!!

June 29, 2014

"Patriotic Puppy"... by PINQUETTE Robin

♥ ♥ ♥ WELCOME PRETTY LITTLE PEACOCKS ♥ ♥ ♥
Make sure to become a Follower
then Stop by the 300 Follower Giveaway TO ENTER TODAY

♥ ♥ ♥ ♥ ♥ ♥ ♥ ♥
 
Hi everyone.

Robin here to share with you a card using a cute little embellishment,
I found this cute image in the Silhouette store
called "Patriotic Puppy"


Isn't that puppy just the cutest?! I decided to add the 3 Girl Jam ribbon and that cute little felt popper to add to the top of the bow. You can get awesome embellishments from the store here. Lots to choose from and Jesssica will work with you to get you exactly what you want :)
Have a great day!
(:(:Smiles:):)
Robin
♥ ♥ ♥ ♥ ♥ ♥ ♥
Thank you Pinquette Robin, for sharing
this very patriotic card!!!
Be sure to visit Robin at her blog the Cricut Scrapper...
Become a New Follower and be inspired by her
beautiful creations!!!

♥ ♥ ♥ ♥ ♥ ♥ ♥
~~**~~**~~**~~
LINK UP YOUR PROJECT...
For Our 6th Challenge!
The theme for this challenge is
Anything Goes
head on over and join in the fun!!!
Snag Our Badge

***************
And then head on over to the NEW PINQUE PEACOCK Crafty Kit Club
Fan Page and check out all the rage there!!!!

June 27, 2014

Sending Happy Your Way!... by PINQUETTE Julie

♥ ♥ ♥ WELCOME PRETTY LITTLE PEACOCKS ♥ ♥ ♥
Make sure to become a Follower
then Stop by the 300 Follower Giveaway TO ENTER TODAY

Looky Looky... it's PINQUETTE Julie O.!!


♥ ♥ ♥ ♥ ♥ ♥
Hello, and happy Friday! Julie here today.
I love using Pinque Peacock products on my projects. They finish them off "oh-so-pretty" -- as you will see!
I made a card with happy colors and a happy theme today. 
After all, it's FRIDAY!
 
I stamped this happy image, then colored it with some bright colored Copic markers. I mounted it on bright papers, and found a great Large Layered Garden Beauty from Pinque Peacock to pull the card all together.
The stamp is from Unity's Stamp of the Week collection, and is called, ironically, "Sending Happy Your Way."

I have a giveaway going on over at my blog, celebrating several events: I wrote my 500th blog post this week, I just reached 400 followers on my blog, and I have over 100 "likes" on my Facebook page, Muddy Paws & Inky Fingers. To celebrate all those things, I have some blog candy that I'd love for you to have a chance at. Please hop on over and leave a comment for your chance to win!
 
I hope you have great plans for the weekend!


♥ ♥ ♥ ♥ ♥ ♥

Thank you PINQUETTE Julie... another picture perfect card!!!
Please visit Julie at her blog Muddy Paws & Inky Fingers
and become a follower!!!

♥ ♥ ♥ ♥ ♥ ♥

~~**~~**~~**~~
LINK UP YOUR PROJECT...
For Our 6th Challenge!
The theme for this challenge is
Anything Goes
head on over and join in the fun!!!
Snag Our Badge

***************
And then head on over to the NEW PINQUE PEACOCK Crafty Kit Club
Fan Page and check out all the rage there!!!!

June 26, 2014

TUTORIAL: Box Card... by PINQUETTE Laura

♥ ♥ ♥ WELCOME PRETTY LITTLE PEACOCKS ♥ ♥ ♥
Make sure to become a Follower
then Stop by the 300 Follower Giveaway
TO ENTER TODAY
♥ ♥ ♥ ♥ ♥ ♥ ♥ ♥
 

Hi Everyone!


Today I am going to share a
tutorial for a box card I made for the blog hop last week!
 

This month Pinque Peacock is all about
Stars and Stripes so I wanted to show you this one again.
For my tutorial I am making a box card for a baby shower.
I am still going to use some wonderful Pinque Peacock goodies.
(some of my favorites )

Step One


You cut your cardstock 6 x 11 1/2
Score lengthwise at 3 1/4
( so it's 3 1/4 on one side of score line and 2 3/4 on the other)
Turn paper around and score at 2 3/4, 5 1/2, 8 1/4, and 11
So your paper will have a top side that is 2 3/4 and a bottom side that is 3 1/4
In the picture the top is the 2 3/4 inch side.
On the 2 3/4 side you will cut down to the score line.
The 1/2 inch piece you will cut right off. (below)


I then picked all my patterned paper and cut it.
I usually cut all my patterned paper 1/8 inch smaller
than piece I want to put it on..
I did ink all the edges of every piece.


I decided to make a gift card holder for this box card.


I cut a piece of cardstock 2 5/8 x 8.
I folded in half then in half again on both side.
I punched a little circle on the top.

I then started to add patterned paper to my card.
I wanted the yellow pins to be upright so I made
sure the box was sitting the way it would when done.


Here is the next step. I added two layers on the
bottoms layers of the card.


I usually put the box together then.. I put strong tape on the
outside of the 1/2 piece and adhered inside the box.


Here is my gift card holder.. I made sure I used
strong tape to add to the back top part of the card.


Here it is.. I actually added a little piece of
patterned paper to cover the card.
It is not attached. It slides in card holder slot.
This will hold up the back of the card.


Here I added two pieces in the middle of the card to add
anything... I am not sure yet what I am going to add
but likely some cute baby clothes I found.


These pieces are 3 1/2 inches wide.
I scored at 3/8 inch on both sides.
You can fold the side back or forth.

When I add these pieces I fold the card sideways
to make sure it will fold properly to send.


Here is my card with a lot of the goodies
I am going to use with it.
Do you see the wonderful Angel Pin....
.....made specially by Jessica!
I am going to add texture to the butterfly and add..
This is from my Crafty Kit Club kit.
The flowers are Petaloo and from the Pinque Peacock store.
The pink and orange pearls with the acrylic sliders are also
from my kit (Crafty Kit Club)
I might add some feathers I got with my kit also
but don't want the card to be too busy..


I will have a picture of the finished card
when it has been given .
I don't want to spoil a surprise.
Here is my blog......
♥ ♥ ♥ ♥ ♥ ♥ ♥ ♥

Thank you PINQUETTE Laura for the awesome tutorial!!
... be sure to visit Laura
at her blog LauraLeesDream
to become a new follower and be inspired by her
gorgeous crafty talent!

♥ ♥ ♥ ♥ ♥ ♥ ♥ ♥
~~**~~**~~**~~
LINK UP YOUR PROJECT...
For Our 6th Challenge!
The theme for this challenge is
Anything Goes
head on over and join in the fun!!!
Snag Our Badge

***************
And then head on over to the NEW PINQUE PEACOCK Crafty Kit Club
Fan Page and check out all the rage there!!!!

June 25, 2014

Crafty Kit Club- June Kit... by PINQUETTE Rhonda

♥ ♥ ♥ WELCOME PRETTY LITTLE PEACOCKS ♥ ♥ ♥
Make sure to become a Follower
then Stop by the 300 Follower Giveaway
TO ENTER TODAY
♥ ♥ ♥ ♥ ♥ ♥ ♥ ♥


Hello crafty peoples ...
Today I am showcasing the fun June Kit in Nautical from Pinque Peacock's Crafty Kit Club! This months kit is jammed packed with some awesome items and products. Today I made a card using the embellishments from the kit with even more left over for other cards or other projects... each month has different choice kits to choose from and check out the subscription options... 


~~**~~**~~**~~
Here is what all comes in the June Kit A- Nautical


 ♥ ♥ ♥ ♥ ♥
Now... without delay... here is my card for you today!!!...

 
Head on over to the NEW PINQUE PEACOCK Crafty Kit Club
Fan Page and check out all the rage there!!!!

♥ ♥ ♥ ♥ ♥ ♥ ♥
Thank you PINQUETTE Rhonda for
sharing your Crafty Kit Club Project!!!
and be sure to visit Rhonda at her
blog Flowers & More by Rhonda
and become a follower!!!
♥ ♥ ♥ ♥ ♥ ♥ ♥

~~**~~**~~**~~
LINK UP YOUR PROJECT...
For Our 6th Challenge!
The theme for this challenge is
Anything Goes
head on over and join in the fun!!!
Snag Our Badge

June 23, 2014

Crafty Kit Club June Kit- Alter Your Life!... by PINQUETTE Lisa

♥ ♥ ♥ WELCOME PRETTY LITTLE PEACOCKS ♥ ♥ ♥
Make sure to become a Follower
then Stop by the 300 Follower Giveaway
TO ENTER TODAY
♥ ♥ ♥ ♥ ♥ ♥ ♥ ♥


Today, I am featuring the Pinque Peacock Crafty Kit Club!

Hello! My name is Lisa and I alter things as a hobby. Many crafters look at things and see exactly what they see….me, I look at things and see what the could be. I look at each product as a raw product, not a finished product. So the Pinque Peacock Crafty Kit Club was just for me! I ordered the whole kit this month and love the canvases, acrylic paints, wood cut outs, feathers, and paper flowers and findings. Those of you who follow me know that I couldn’t use them as is…..lol, that is SO NOT ME!

So here goes: here is what I received…..


And this is the finished product.
In addition to the paints and products in the kit, I used several inks, paints and finishes to adjust them to what I “saw” when I saw this kit. After I finished the canvas color, I really wanted to stamp a “subway art” style finish. I didn’t quite get there, but, I love the effect. Again as before, on alternative objects, I have used black letterpress ink to stand out. I used the wood cutouts of the hibiscus and butterfly and used the paper flowers, several of which I stained and layer with mini elegant florals from Pinque Peacock.

The ribbon from 3 Jam Girls I received was red…it didn’t match the pallet I had in mind….but you know what….it didn’t’ stop me from dying and glittering it. Every item in this kit has been altered in some form. Never stop your imagine and desire to alter!

Until Next Time~
Lisa


Head on over to the NEW PINQUE PEACOCK Crafty Kit Club
Fan Page and check out all the rage there!!!!


♥ ♥ ♥ ♥ ♥ ♥ ♥ ♥
Thank you PINQUETTE Lisa,
your project is AWESOME!!
Visit Lisa at her blog
to become a New Follower!

♥ ♥ ♥ ♥ ♥ ♥ ♥ ♥
~~**~~**~~**~~
LINK UP YOUR PROJECT...
For Our 6th Challenge!
The theme for this challenge is
Anything Goes
head on over and join in the fun!!!
Snag Our Badge

June 22, 2014

Busy As A Bee!... by PINQUETTE Miranda

♥ ♥ ♥ WELCOME PRETTY LITTLE PEACOCKS ♥ ♥ ♥
Make sure to become a Follower
then Stop by the 300 Follower Giveaway
TO ENTER TODAY!!!
♥ ♥ ♥ ♥ ♥ ♥ ♥ ♥ ♥ ♥ ♥


Good Morning and Happy Sunday!
 
It's me again posting for Pinque Peacock today. I created a card using some awesome products you can find over at Pinque Peacock.


My card is rather simple today but I wanted to be sure to focus on my Pinque Peacock Pretties. First off I used the Darice Honeycomb Embossing folder which you can find in Pre-Order Discount Hut! I love that folder. I added a FABULOUS layered garden beauty. I cut a couple of bees from Create A Critter Cricut Cartridge and added some baker's twine. I did not add a sentiment because, well I don't know what I want to use the card as yet! LOL

It' s not to late to enter the Anything Challenge happening right now at the Pinque Peacock Challenge Blog. I'll bee linking my card!!!!
~~**~~**~~**~~
LINK UP YOUR PROJECT...
For Our 6th Challenge!
The theme for this challenge is
Anything Goes
head on over and join in the fun!!!
Snag Our Badge

Head on over to the NEW PINQUE PEACOCK Crafty Kit Club
Fan Page and check out all the rage there!!!!

June 21, 2014

It's All in The Hat!... by PINQUETTE Mary

♥ ♥ ♥ WELCOME PRETTY LITTLE PEACOCKS ♥ ♥ ♥
Make sure to become a Follower
then Stop by the 300 Follower Giveaway
TO ENTER TODAY
♥ ♥ ♥ ♥ ♥ ♥ ♥ ♥ ♥ ♥ ♥


Good Morning my lovelies, Pinquette Mary here on this gorgeous Saturday Morning!
Today I am so excited to share my Anything Goes post with you. I recently ordered some gorgeous fabric covered buttons from the Pinque Peacock Shop and Jessica just whipped them up right in time for me to use on my projects. I just love Nanas' Pillowcase collection.
Yup, I said projects using the same base but using different embellishments to add that sense of style. Here we go......


I am fortunate enough to be able to test patterns for a doll pattern company where the designers have you test their patterns before they are released so that all the kinks are worked out and you have a well thought out pattern. When I tested this Cloche as well as a "straw" hat pattern I knew there would be a way to use the fabulous Pinque Peacock buttons in the decorative phase.


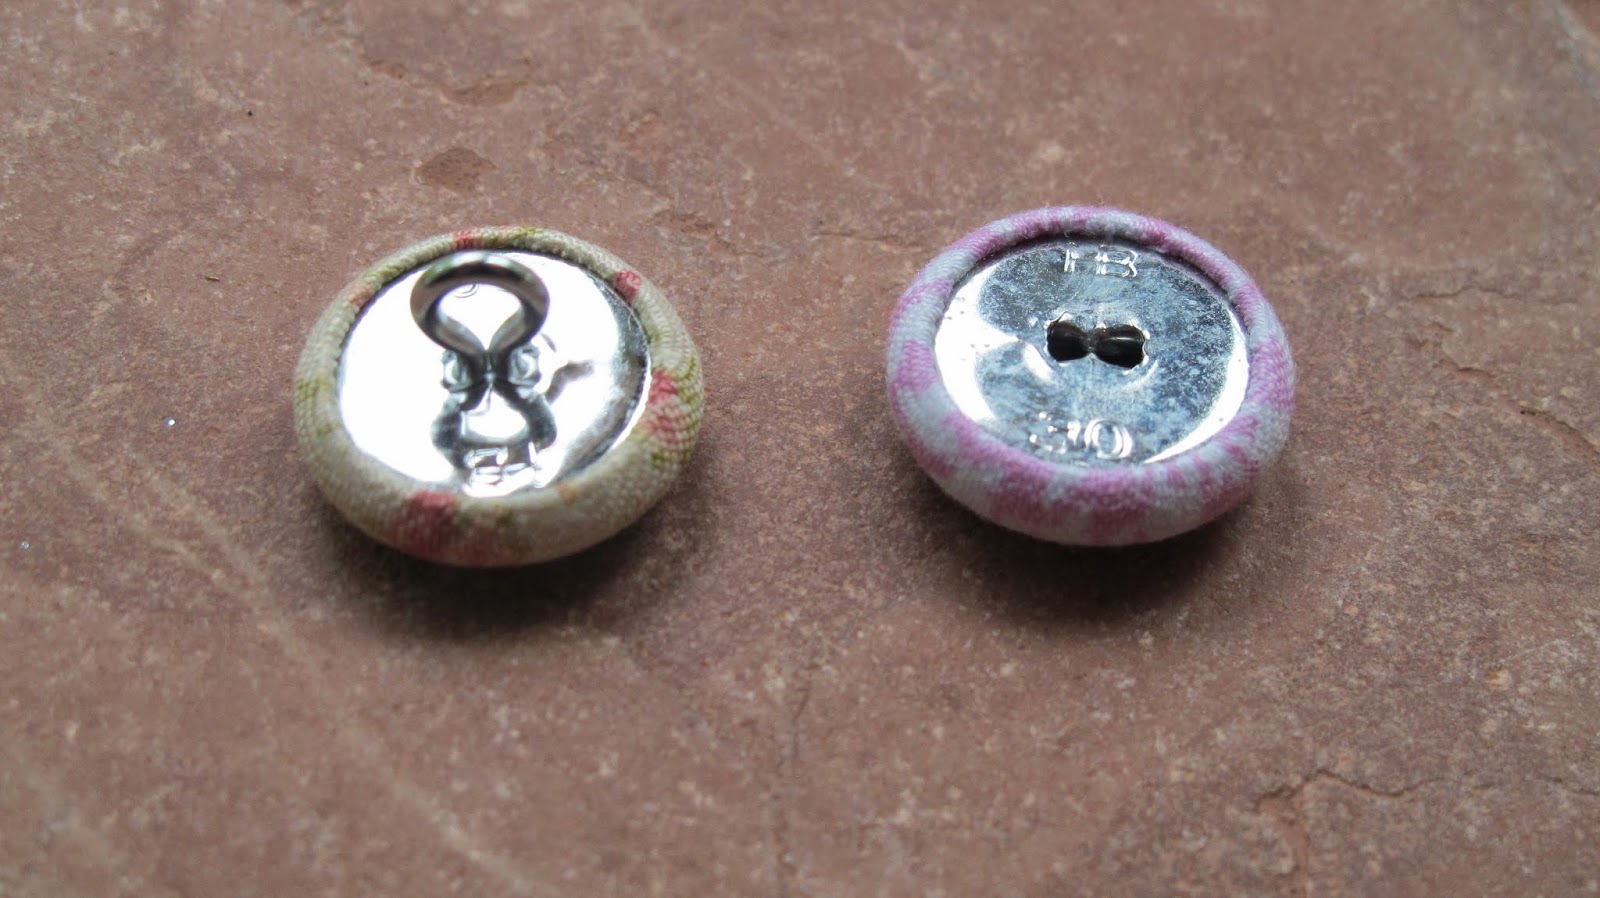
Did you know that you can specialize how you want your buttons? You can have them either with shank or no shank. The pink one on the left is without the shank so I could just glue it on the crocheted flower whereas the one on the left has the shank so I could just sew it on the raffia bow. I also used some 3 Girl Jam crinkle ribbon on the purple hat (I know it looks blue, but, trust me it's purple!) Yes, Jess also carries this great ribbon in the SHOP in a variety of colors.


Here is the same shank button application on the straw hat. I case you are not into dolls, this would be a great way to dress up your own beach hat for a truly distinctive look. This would be great to add a group of these buttons with some crinkle ribbon. Cool idea, huh?
To learn more about this project be sure to head over to my blog http://Mary-fortheloveofart.blogspot.com and I would love to have you as a follower.
 
~~**~~**~~**~~
LINK UP YOUR PROJECT...
For Our 6th Challenge!
The theme for this challenge is
Anything Goes
head on over and join in the fun!!!
Snag Our Badge

Head on over to the NEW PINQUE PEACOCK Crafty Kit Club
Fan Page and check out all the rage there!!!!