January 31, 2014

My Valentine!... by PINQUETTE Amanda

♥ ♥ ♥ WELCOME PRETTY LITTLE PEACOCKS ♥ ♥ ♥
Make sure to become a Follower
then Stop by the 300 Follower Giveaway
TO ENTER TODAY
♥ ♥ ♥ ♥ ♥ ♥ ♥ ♥ ♥ ♥ ♥ ♥ ♥ ♥ ♥ ♥ ♥

HEY HEY HEY...
PINQUETTE, Amanda is in the house!!!
 
♥ ♥ ♥ ♥ ♥ ♥
 
Hi all! Pinquette Amanda here.

I finally found the perfect place for this Layered Garden Beauty.

 
My middle child, my oldest daughter will have her first valentine exchange at school in a couple weeks so when I found this cute little purse on the silhouette online store, the right paper coordination and embellishment just popped into my little pinquette brain.


This purse, though it may look difficult and/or intimidating, was super quick and easy to put together. I hope you'll give it a try! If you do, I would love to see it! You can always post your projects using your pinque peacock beauties over at the Pinque Peacock Art Gallery

Thanks for stopping by today! If you'd like to see more of my creations,
be sure to check out my blog and facebook page!


 ♥ Amanda ♥
 
♥ ♥ ♥ ♥ ♥ ♥ ♥ ♥

Thank you PINQUETTE Amanda... this is
soooo stickin' CA UTE!!!
...and be sure to visit Amanda at her blog
The Scrapoholic Candy Shop to
become a NEW FOLLOWER!!
♥ ♥ ♥ ♥ ♥ ♥ ♥ ♥
~~~***~~~***~~~
Hey, did you know you can custom order with our FABRIC OPTIONS???...
but that's not all custom order you Stick Pins with the BEAD BUFFET...
you can even chose beads for you own personal use!!!
Did you know you can also
purchase Gift Certificates from the shop???
Get one for that hard to buy for crafter!!

~~~***~~~***~~~

January 30, 2014

Love Is In The Air!... My Valentine... by PINQUETTE Kimberly

♥ ♥ ♥ WELCOME PRETTY LITTLE PEACOCKS ♥ ♥ ♥
Make sure to become a Follower
then Stop by the 300 Follower Giveaway TO ENTER TODAY

Today I have a two for one posting to share with you. I just love it when I can take multiple products and use on one project. The main products on this posting are from Pinque Peacock and Scrapbook Stamp Society.
Today I have a great little card to share with you. This beautiful little lady is a Sherri Baldy Stamps My Bestie. I just love the big eyed beauties. There are so many wonderful things you can do with them.

I decided to try my hand at something a little different this go around. This time instead of making just a card, I wanted to make a step card. *sigh, what was I thinking*!!!! Thankfully after a little bit of searching, I found a nice card on the Silhouette Online site and the hard part was done. I did not have to do the measurements.

I love using my Silhouette and try to use it as often as I can for my craft projects. So this time around, I tried something really different. I took my digi and imported her into my software then did a trace. However, because of the little hairs and other tiny lines, she did not cut out as neatly as I would desire. So, instead of trying to cut her that way, I did a very small offset on her and it worked beautifully. I then did an offset of the offset (yes, I realize that does not sound quite right) so that I could have a shadow for the adorable little girl.

I embellished my card with paper piecings from Miss Kates Cuttables, the Silhouette Store, and some stamped images. However, I felt she still needed something more, so I turned to my trusty stash of fabulous Pinque Peacock pretties to see what I have that night match. The beautiful pink popper was perfect for this little lady. A perfect addition, doesn't it look like a tiny carnation? I then added one of the wonderful pearl stick pins as well. I think the combination set the card perfectly, what do you think?
Thank you for taking the time to stop in and visit my blog
I always love to read your comments.
 
 
♥ ♥ ♥ ♥ ♥ ♥ ♥ ♥
 
Thank you PINQUETTE Kimberly,
your card is AMAZING!!
Visit Kimberly at her blog
to become a New Follower!

♥ ♥ ♥ ♥ ♥ ♥ ♥ ♥
~~~***~~~***~~~
Hey, did you know you can custom order with our FABRIC OPTIONS???...
but thats not all custom order you Stick Pins with the BEAD BUFFET...
you can even chose beads for you own personal use!!!
Did you know you can also
purchase Gift Certificates from the shop???
Get one for that hard to buy for crafter!!

~~~***~~~***~~~

January 29, 2014

I "RUFF" you Valentine... by PINQUETTE Robin

♥ ♥ ♥ WELCOME PRETTY LITTLE PEACOCKS ♥ ♥ ♥
Make sure to become a Follower
then Stop by the 300 Follower Giveaway
TO ENTER TODAY
♥ ♥ ♥ ♥ ♥ ♥ ♥ ♥ ♥ ♥ ♥ ♥ ♥ ♥ ♥ ♥

We have PINQUETTE Robin with us
today with some tasty treats!!! 

 
♥ ♥ ♥ ♥ ♥ ♥ ♥ ♥

Hello and good morning to all you wonderful Pinque Peacock fans out there!!

I was surfing around at the online store for Silhouette earlier this week. (Trying to use up some of my credits hehe) and found this cute little treat bag and some of the cutest little print and cut images for Valentines and just had to have them :)

I decided to make a little treat for my DH and since he loves M&M's thought I would fix a little sweet valentine for him with one of his favorite candies and some of my favorite things. A win win for both of us!
 
 
I started out cutting the treat bag and little valentine dog. Then I looked at my "Pinque" goodies that I had on hand and using some of my Authentique Valentine paper thought that this beautiful "Farm Fresh" burlap button would go great with it and not be too girly for his valentine :D I also added some cherry cupcake trendy twine at the top.

Although truth be known he probably will only have his eyes focused on the candy!! LOL Okay, okay...I'ts a little "cutesy". But, hey!! Guys deserve some cuteness in their lives. That's why they have us right??

Have a great day and don't forget to hop on over and get some of your favorite goodies from the shop to make your projects extra special for that special person in your life :D
(:(:Smiles:):)
Robin
 
♥ ♥ ♥ ♥ ♥ ♥ ♥
 

Thank you Pinquette Robin, for sharing
your ADORABLE treat box!!!
Be sure to visit Robin at her blog the Cricut Scrapper...
Become a New Follower and be inspired by her
beautiful creations!!!

♥ ♥ ♥ ♥ ♥ ♥ ♥

~~~***~~~***~~~


Hey, did you know you can custom order with our FABRIC OPTIONS???...
but thats not all custom order you Stick Pins with the BEAD BUFFET...
you can even chose beads for you own personal use!!!
Did you know you can also
purchase Gift Certificates from the shop???
Get one for that hard to buy for crafter!!

~~~***~~~***~~~


January 28, 2014

~~**Swirls of Love**~~,,, by PINQUETTE Shelley

♥ ♥ ♥ WELCOME PRETTY LITTLE PEACOCKS ♥ ♥ ♥
Make sure to become a Follower
then Stop by the 300 Follower Giveaway
TO ENTER TODAY
♥ ♥ ♥ ♥ ♥ ♥ ♥ ♥ ♥ ♥ ♥ ♥ ♥ ♥ ♥ ♥ ♥

~~**HEY HEY HEY**~~
PINQUETTE Shelley is here today...
we sure missed her in her absence
and glad to have her back
sharing her Beautiful Card!!


Valentines Day with Pinque Peacock
 
Hi everyone!! It is great to be back to posting with Pinque Peacock!!!
Now no project is complete without 1 of the wonderful hand made products from Jessica the owner of Pinque Peacock. On this project I used 2 of my favorite products. I love the
Elegant Florals and have them on most of my cards and layouts. My other favorite are the amazing Beaded Stick Pins!!! Now here is a picture of my Valentine Card...
 
♥ ♥ ♥ ♥ ♥ ♥ ♥ ♥

Thank you PINQUETTE Shelley...
your card is absolutely GEOrGeOuS!!!
Visit Shelley at her blog Scrapbooking For Fun...
become a New Follower!!!

♥ ♥ ♥ ♥ ♥ ♥ ♥ ♥
~~~***~~~***~~~

Hey, did you know you can custom order with our FABRIC OPTIONS???...
but thats not all custom order you Stick Pins with the BEAD BUFFET...
you can even chose beads for you own personal use!!!
Did you know you can also
purchase Gift Certificates from the shop???
Get one for that hard to buy for crafter!!

~~~***~~~***~~~

January 27, 2014

Sping is in the air!!!... by PINQUETTE Laura

♥ ♥ ♥ WELCOME PRETTY LITTLE PEACOCKS ♥ ♥ ♥

Make sure to become a Follower
then Stop by the 300 Follower Giveaway
TO ENTER TODAY
♥ ♥ ♥ ♥ ♥ ♥ ♥ ♥ ♥ ♥ ♥ ♥ ♥ ♥ ♥ ♥ ♥

BEFORE WE GET STARTED
WE HAVE A WINNER TO ANNOUNCE
~~~~******DRUM ROLL PLEASE******~~~~
Pinque Peacock wants to THANK everyone who joined us for our 
LOVE IS IN THE AIR! Blog Hop... 
all the products are available NOW in the shop for purchase!!!

Now onto the winner.......... CONGRATS to........ 

****ANGELA CRAFTY SPOT****... 
WHOOP WHOOP!!!! YAYYYYY!!!... Please message us via facebook
 at PINQUE PEACOCK for your prize details!!!

*********************************************************

~~**WHOOP WHOOP**~~
PINQUETTE Laura
is in the house today!!!


♥ ♥ ♥ ♥ ♥ ♥ ♥ ♥

I am wanting Spring to come so bad I thought I would help it along a little.
Today my project is a Spring Bouquet for someone's Love!
The quote says "You make flowers grow even in the saddest part of me"

On the front of the vase are two pins....
An Angel Pin and a gorgeous black and white beaded pin(made just for me!)
Also I used An Elegant Floral Pleated Petal in white... (custom ordered)
I also used some of the charms that Jessica has for this month!!!


Come and check out my blog for some more details...

♥ ♥ ♥ ♥ ♥ ♥ ♥ ♥

Thank you PINQUETTE Laura, You ROCK!!!...
great way to vamp up a vase... LOVE IT!!
... be sure to visit Laura
at her blog LauraLeesDream
to become a new follower and be inspired by her
gorgeous crafty talent!

♥ ♥ ♥ ♥ ♥ ♥ ♥ ♥
Have you seen all the NEW YUMMY GOODIES
that are available at Pinque Peacock
in THE DISCOUNT HUT @ Pinque Peacock portion of the shop?


Delightful and Unique items are available now
and AS ALWAYS
you can get them at Deep Discounted Prices
~~~***~~~***~~~

Ordering is SUPER Easy, too...


Did you know you can also
purchase Gift Certificates from the shop???
Get one for that hard to buy for crafter!!
~~~***~~~***~~~

January 26, 2014

Tutorial: A FUN Embossing technique... by PINQUETTE Jessie

♥ ♥ ♥ WELCOME PRETTY LITTLE PEACOCKS ♥ ♥ ♥
Make sure to become a Follower
then Stop by the 300 Follower Giveaway TO ENTER TODAY

We are delighted to bring you another Tips and Tutorials Post!
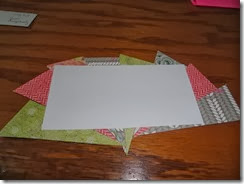
Today it's all about
"FUN WITH EMBOSSING"

Hi! It's Jessie :) I have a fun tutorial on some great ways to use embossing folders.
I am going to share a few different techniques you can use with the folders. I have one completed project to share today and I'll have more in the future with some of the techniques shown.

Regular Embossing
I just ran this one through the machine with a Darice heart folder. You can find the folder at the Pinque Peacock Discount Hut Here,
Lightly Sanded
This one I again ran it through the machine and then lightly sanded the hearts.


Inked Debossing
.

I used a polka dot folder and just inked the back panel of the embossing folder.


So it comes out like this. The image is pushed into the paper with the ink.

Painted.


This one I used a paint dauber to paint the back of the embossing folder. The 2 ways to do this technique is after painting run it through the machine. That is the paper on the right. The one of the left after I painted it, I laid the paper in and just smoothed it against the paint with my hand. It gives it a more distressed look.

I used the regular embossing to create this project.


Here is a close up of the adorable Pinque Peacock Angel Stick Pin. I hope you enjoyed the tutorial.
I can't wait to see if you use the techniques.

January 25, 2014

Tutorial: The Perfect Starburst with Guest Designer Janet

How are all of our Pretty Little Peacocks Today?

Today we are honored to have a great friend and former Pinquette joining us with a FABULOUS Tutorial: Create the Perfect StarBurst!


Please join me with a Warm Welcome Back for Janet Royer from Janet's Creative World


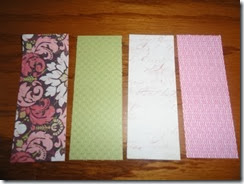
DSC04161

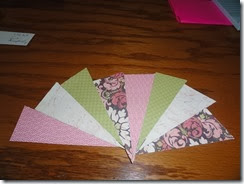
Gather 4 coordinating papers. I used CTMH and 2, using both sides of the paper (4) Cut to 1 1/2 inches by 4.

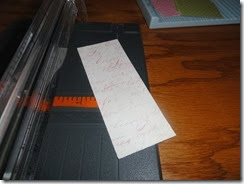
DSC04162

Cut from top right corner to bottom left corner, forming 2 diagonals.

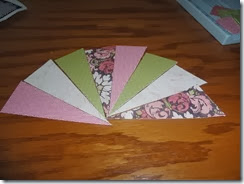
DSC04163

Arrange in a pleasing combination of patterns.

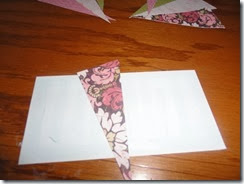
DSC04164

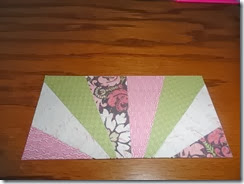
Cut a base, I cut mine at 5 1/2 to 4 1/4 to fit my card base. Mark the center point top and bottom. Apply glue to the entire base. This is where we’ll lay out our pieces. Begin with placing one center piece on your marks, then apply each piece to the side. Make sure you cover the base.

DSC04165

To cover the base, the papers will NOT be lined up at the top or even the bottom… Don’t be alarmed.

DSC04166

When you’ve applied all the pieces, flip the base over and trim the edges around your base.

DSC04167

The Perfect SunBurst! All ready for your project.

DSC04170

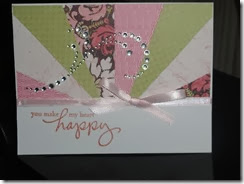
I added mine to a white card base, using ribbon to cover the bottom of the base. Stamped “You Make Me Happy (Amuse Stamps) in Sorbet ink (CTMH) and added ribbon and some bling (CTMH). This reminds me of my Grandmother who quilted and often we saw our outgrown clothes in the quilts she made. She’s gone now but I think of her often and because of her and others in my family, the love of creating and crafting was instilled early! Thanks for stopping by today!


January 24, 2014

Seriously? Our First Ever Product Spotlight by PINQUETTE Julie

♥ ♥ ♥ WELCOME PRETTY LITTLE PEACOCKS ♥ ♥ ♥
Make sure to become a Follower 
then Stop by the 300 Follower Giveaway TO ENTER TODAY

Hello, creative friends! Julie here today from Muddy Paws & Inky FingersI'm so pleased to be bringing you today's PRODUCT SPOTLIGHT!
I'm spotlighting the large fabric buttons.  They're big, they're bold, and they're BEAUTIFUL.  I was given two of them to work with to showcase today.  Both of them are so pretty all by themselves.


These 1 1/2 inch buttons work so well for 3D projects because of their size.  Here's what I created with the Pink Snakeskin button:


This cute little heart-shaped box was cut out on my Silhouette.  I made a floral ribbon to support the button from 3 Girl JAM Tuxedo Black crinkle ribbon from the Celebrations Bundle.
Here's another view:


I had a great time with the Summer Safari 1.5 inch button.  I made another box.  This one, I cut out on my Cricut:


Isn't that owl just the cutest?  This is Bernie, a Unity Stamp Company Itty Bitty. I colored him with Copic markers, then used some Stickles glitter glue on his hat and a Viva Decor Pearl pen (available from Jessica's Discount Hut) on the snow on the branches. The paper is a retired paper from Close To My Heart, but I thought it was the perfect match for this Summer Safari button.  The ribbon is once again 3 Girl JAM.  I used Cherry Lipstick from the Pink & White Bundle.
And, another view of the button, owl, and box...


I love these buttons! There's a great variety of them in the Pinque Peacock shop.  Check them out and see where your creativity takes YOU!