Showing posts with label Guest Designer. Show all posts

April 25, 2014

PINQUE PEACOCK has a Special Guest.... Welcome Guest Designer Irene Chapman

How are all of our Pretty Little Peacocks Today?

♥ ♥ ♥ ♥ ♥ ♥ ♥ ♥ ♥

Please join me with a Warm Welcome for today's
Guest Designer Corinne Jones


♥ ♥ ♥ ♥ ♥ ♥ ♥ ♥ ♥
Hello, my name is Irene Sherman
You can find my creations on my blog at Irene's Card Creations
I am a mother of 5 kids, all young adults now.
I work full time and love to make cards/projects
in my free time.
I am on the Spectrum Noir Design Team
and also Simply Betty Design Team.

The card I made here is for a dear friend
that is getting married. 

This card has the digi from "Milk Coffee" called:
Tiffany in Roses Bridal Gown.
I wanted this to be very elegant because that
is how this bride is.  Her colors are the colors I used on
this card.  When I placed the flowers on this card, it always
looks best to not have everything perfectly in order.
Having something that sticks up, odd numbers of flowers, etc.,
makes it look soo much better.  I ordered this pin from Pinque Peacock and
it worked soo perfectly to come out from the flowers and the color matched perfectly.
When I use the pins, I put a drop of Glossy Accents on the end, if it sticks out from under the flowers.
This keeps anyone from getting "stuck" from the pin.  Works great. Or use a wire
cutter to cut the stem down a little.  They have many sizes of pins so you can get whatever size best suites
your needs.  They make the pins to match what you want and I gave them ideas of what I wanted
and loved everyone I received.  Great "accent" to any project/card.
I used a diecut (music notes) and the coloring was done with Spectrum Noir Markers.
I hope you enjoy it.

Irene, thank you so much for joining us here at PINQUE PEACOCK!!!
Be sure to visit Irene at her blog Irene's Card Creations to
see more of her beautiful creations!!!
♥ ♥ ♥ ♥ ♥ ♥

Custom order you Stick Pins with the BEAD BUFFET...
you can even chose beads for you own personal use!!!
~~~***~~~***~~~
JOIN US NOW, for our 4th Challenge!

The theme for this challenge is
FLOWERS
Snag Our Badge

~~~***~~~***~~~

Be sure to also check out the new
CRAFTY KIT CLUB
on FACEBOOK


April 24, 2014

Product Spotlight: Beaded Stick Pins with our Lovely Guest Designer - Christy L.

How are all of our Pretty Little Peacocks Today?

Today's 
IS BROUGHT TO YOU BY 
OUR FABULOUS AND TALENTED GUEST:


Christy Lepine of Christy's Crafty Corner Blog {CLICK HERE}
You can also visit Christy at her YouTube Challenge {CLICK HERE}

<<>>
Hello and welcome to all of you lovely Peacocks!

My name is Christy and I'm here today because our fearless leader Jessica asked if I would like to be a guest designer. My reply was.......letmethinkaboutthatoneminute.....YES!!  Talk about a no-brainer!!

OF COURSE I would love to pop in and tell everyone about one
of my FAVORITE Pinque Peacock's products:

Beaded Stick Pins


These stunning pins perfectly accent many projects.
The beads are GORGEOUS and fit so many different styles. 


~~**~~**~~**~~
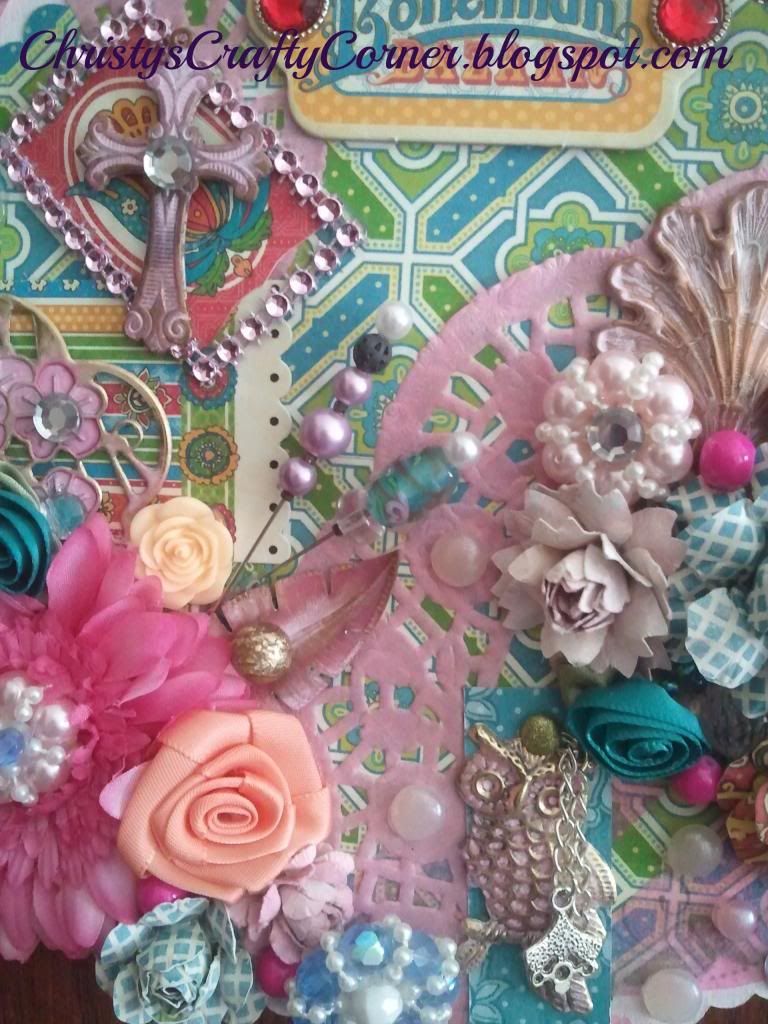
My favorite way to use the Beaded Stick Pins is as a "bridge"
between different parts of my projects.


~~**~~**~~**~~
I like to be able to help move the eye from one collage to another.


~~**~~**~~**~~
 
Though sometimes, I just like to use them because they are just SO beautiful!


~~**~~**~~**~~
 
I created the Springtime In Paris canvas just for today's post. 


As you look at the project you'll see that I also used a few
 more Pinque Peacock goodies when I created it.
The Elegant Florals can really elevate the look of any project.
On this canvas I chose to alter mine.


~~**~~**~~**~~

As you watch the video you'll notice that I also used the


Thank you for letting me share my love for these amazing
products and I hope to see you again soon!

~Christy
♥ ♥ ♥ ♥ ♥ ♥
Christy.... thank you so much for joining us here at PINQUE PEACOCK!!!
Be sure to visit Christy at her blog Crafty Corner Blog
to see more of her beautiful creations!!!
♥ ♥ ♥ ♥ ♥ ♥
~~**~~**~~**~~
LINK UP YOUR PROJECT...
For Our 4th Challenge!
The theme for this challenge is
FLOWERS....
head on over and join in the fun!!!
Snag Our Badge
***************
And then head on over to the NEW PINQUE PEACOCK Crafty Kit Club
Fan Page and check out all the rage there!!!!

February 24, 2014

Yvonne Morentin: Product Spotlight - Paper Mache' Heart Box

♥ ♥ ♥ WELCOME PRETTY LITTLE PEACOCKS ♥ ♥ ♥
Make sure to become a Follower 
then Stop by the 300 Follower Giveaway TO ENTER TODAY


We are thrilled to have our LOVELY& SWEET FRIEND,
Yvonne Morentin of Adventure of the Creative Mind


bringing you today's PRODUCT SPOTLIGHT!


Today I am so excited to share a project I made...
A Paper Mache Heart Box... 
For a Birthday...

I usually share cards that I have made...
But I really do make many other things...
And today is the day I get to share 
an adorable creation... 

I made this adorable heart box...
It is from Pinque Peacock.
They carry an amazing range of awesome items.
From hand made flowers, felt poppers,
paper mache boxes, books, hearts & shapes,
pins, embossing folders and so many other things...
 

I just LOVE to order my supplies from
Pinque Peacock...

Today my project is a Paper Mache Heart Box...


I wanted my Heart Box to look just like a cake...


I used:

Paper Mache Heart Box  by Pinque Peacock
Pink Metallic Paint by Apple Barrel
Signo
Glossy Accents
Sunny Skies Chevron Paper by PPPR
Felt Poppers by Pinque Peacock
 Fabric Poppers by Pinque Peacock
Pearl Hearts by Miriam's Crafting Supplies
Clear by Wink Of Stella
Valentine Dies by Jaded Blossom
Love by Paper Smooches
Stampin' Up
Wooden Heart by Pinque Peacock
Mister Huey's


Here are some images to show the work in progress...
Yvonne S. Morentin- http://adventureofthecreativemind.blogspot.com/
I painted the Paper Mache Heart Box with Metallic Pink Paint.
Covered the inside, outside, top & bottom with my paper.

With the Ice White Pearl Pen I decorated around the bottom edge of box (pictured here)...
Yvonne S. Morentin- http://adventureofthecreativemind.blogspot.com/

This is the lid of box. I also used the Ice White Pearl Pen to add 3 rows to give the look of icing... 


Yvonne S. Morentin- http://adventureofthecreativemind.blogspot.com/
Side view of lid. Here you see 3 rows of pearls to make icing effect.


Yvonne S. Morentin- http://adventureofthecreativemind.blogspot.com/
The Paper Mache Heart Box is so easy to paint & decorate. 
It is sturdy and held up extremely well to 2 coats of paint, glue and the pearl pen...


My Adorable Heart Box... 

Yvonne S. Morentin- http://adventureofthecreativemind.blogspot.com/

The Paper Mache Heart Box is complete...

I added a large Felt Popper (in white)...
2 Fabric Poppers and 3 Flat Back Fabric Covered Buttons in pink...
I added the wooden heart that I sprayed to make it pink.

Yvonne S. Morentin- http://adventureofthecreativemind.blogspot.com/
A close up of Poppers, Buttons & Heart... 


Yvonne S. Morentin- http://adventureofthecreativemind.blogspot.com/
Side View


Yvonne S. Morentin- http://adventureofthecreativemind.blogspot.com/


Yvonne S. Morentin- http://adventureofthecreativemind.blogspot.com/


Yvonne S. Morentin- http://adventureofthecreativemind.blogspot.com/
Inside View of Paper Mache Heart Box...


Yvonne S. Morentin- http://adventureofthecreativemind.blogspot.com/


Yvonne S. Morentin- http://adventureofthecreativemind.blogspot.com/

I really enjoyed working with the paper mache heart 
box. 

I must say I am surprised at how it easy it was to create with it.

The paper mache is sturdy and handles very well. 
It is an awesome find at a fantastic price.

If you would like to make one of your own you can find 
the Paper Mache Heart Box
and many more Paper Mache shapes
at Pinque Peacock.


♥ ♥ ♥ ♥ ♥ ♥ ♥ ♥ ♥ ♥ ♥ ♥
YVONNE - 
THANK YOU SO MUCH FOR JOINING US TODAY AS OUR GUEST DESIGNER AND SHARING A WONDERFUL PRODUCT SPOTLIGHT
♥ ♥ ♥ ♥ ♥ ♥ ♥ ♥ ♥ ♥ ♥ ♥


January 25, 2014

Tutorial: The Perfect Starburst with Guest Designer Janet

How are all of our Pretty Little Peacocks Today?

Today we are honored to have a great friend and former Pinquette joining us with a FABULOUS Tutorial: Create the Perfect StarBurst!


Please join me with a Warm Welcome Back for Janet Royer from Janet's Creative World


DSC04161

Gather 4 coordinating papers. I used CTMH and 2, using both sides of the paper (4) Cut to 1 1/2 inches by 4.

DSC04162

Cut from top right corner to bottom left corner, forming 2 diagonals.

DSC04163

Arrange in a pleasing combination of patterns.

DSC04164

Cut a base, I cut mine at 5 1/2 to 4 1/4 to fit my card base. Mark the center point top and bottom. Apply glue to the entire base. This is where we’ll lay out our pieces. Begin with placing one center piece on your marks, then apply each piece to the side. Make sure you cover the base.

DSC04165

To cover the base, the papers will NOT be lined up at the top or even the bottom… Don’t be alarmed.

DSC04166

When you’ve applied all the pieces, flip the base over and trim the edges around your base.

DSC04167

The Perfect SunBurst! All ready for your project.

DSC04170

I added mine to a white card base, using ribbon to cover the bottom of the base. Stamped “You Make Me Happy (Amuse Stamps) in Sorbet ink (CTMH) and added ribbon and some bling (CTMH). This reminds me of my Grandmother who quilted and often we saw our outgrown clothes in the quilts she made. She’s gone now but I think of her often and because of her and others in my family, the love of creating and crafting was instilled early! Thanks for stopping by today!


January 23, 2014

WELCOME Julie Kraling from 3 Girl JAM as our Guest Designer

How are all of our Pretty Little Peacocks Today?

Okay, it should be no surprise that we are THRILLED to have our Beautiful Friend, Julie (aka "Jewels") joining us with a delightful project share as our Guest Designer today.

Please join me in Welcoming Julie Kraling, Owner of 3 Girl JAM, from


Hi Everyone!

I am so excited to be Guest Designing at Pinque Peacock today!!

I was beyond thrilled when the Fabulous Miss Jessica asked me to join her team for the day.
I just LOVE me some Pinque Peacock!
Not only is the name fun to say:
Pinque Peacock
Pinque,
Pinque Peacock!

But--
They have super fun stuff in their shop!

If you have never checked it out,
Do Not Hesitate!!

The month of January is all about LOVE at PP.
Here is a quote to get you in the mood:

"Love is the Beauty of the Soul"
- Saint Augustine

That is what inspired my special box to hold all of my Pinque Peacock goodies.

 Lots of Pinque Peacock and 3 Girl JAM Crinkle Ribbon!

 New Lace from 3 Girl JAM (Coming to the store soon!)

 3GJ Flair!

Pinque Peacock Fabric Poppers, Fabric Covered Buttons, and Stick Pins!

 A box full of Pinque Peacock goodness!

All together now!


Thank you for having me Jessica!

I had a great time!

*****So Sweet!  So Cute! SQUEALING over this for Sure!!!*****
Peacocks, don't you just adore this project?
Boy, oh boy, did Julie ever Deliver!!!!

Be sure to stop over to Julie's Blog, A Little Bit of Bling,  and check out her other Sweet & Cute projects she has created in her Blogging Journey!

After that, check out the 3 Girl JAM Shop to get your orders in for some of your very own awesome products, too!

There is also a fantastic Challenge Blog to link up your projects and show off your love of 3GJ.  You are sure to find tons more inspiration, too!


Did you know that we make our Elegant Floral Flowers from the Divine 3 Girl JAM Crinkle Ribbon????
YEP!  YEP!!  YEP!!!
We love Julie and 3 Girl JAM so much, that we never want them far from us!

You can create your own awesome Crinkle Ribbon Flowers after you order some of the Amazing and Vibrant Colors at the 3GJ Shop. Just like you see here today on Julie's beautiful box of goodies.

But, if you aren't able to create your own flowers due to time or other restraints, Pinque Peacock would love to create them for you!  Custom Order yours Today!

THANK YOU SO MUCH FOR JOINING US TODAY JULIE!
Peacock Hugs & Crafty Love